Family Evacuation Plan: Step-by-Step Guide
家族避難計画・連絡方法
Having a clear, written evacuation plan — agreed upon by every household member in advance — is one of the single most effective steps you can take in disaster preparedness. When a major earthquake strikes, phone lines may be jammed, power may be out, and family members may be at different locations. A pre-agreed plan removes uncertainty and reduces the risk of separated family members making dangerous decisions under stress.
This guide walks you through creating a complete family evacuation plan: from identifying your local evacuation sites to establishing communication protocols and a printed household plan card.
Step 1 — Know Your Evacuation Sites
Every municipality in Japan designates official evacuation sites (避難場所, hinan basho) and evacuation shelters (避難所, hinan-jo). These are typically public schools, community centers, and parks. There are different types:
- Designated Emergency Evacuation Site (指定緊急避難場所) — where you go immediately during a disaster to escape imminent danger (tsunami wave, landslide, flood)
- Designated Evacuation Shelter (指定避難所) — where you go for longer-term shelter if you cannot return home; typically a school gymnasium
- Welfare Evacuation Shelter (福祉避難所) — facilities designed for elderly people, people with disabilities, and others requiring special care
Find Your Evacuation Sites Now
Do not wait for a disaster to find out where your nearest evacuation site is. Visit your city or ward office website and search for your local bousai (防災) or hazard map page. The national Disaster Portal at disaportal.gsi.go.jp also shows all designated evacuation sites on an interactive map.
- Locate your nearest primary evacuation site. Visit your ward or city office website and download the local hazard map (ハザードマップ). Identify the designated emergency evacuation site within walking distance of your home — ideally one that can be reached in under 15 minutes on foot.
- Identify a secondary site. Your primary site may be inaccessible (damaged road, crowd). Identify a second site and walk the route in advance so family members know it by memory.
- Check the site type matches your hazard. Different sites protect against different hazards — tsunami, earthquake, flood, or fire. Confirm the site you have chosen is designated for the type of disaster most likely in your area.
- Walk the route with your family. Physical familiarity with the route makes a difference under stress. Note potential obstacles: narrow alleys, underpasses that flood, overpass staircases that may be dangerous after an earthquake.
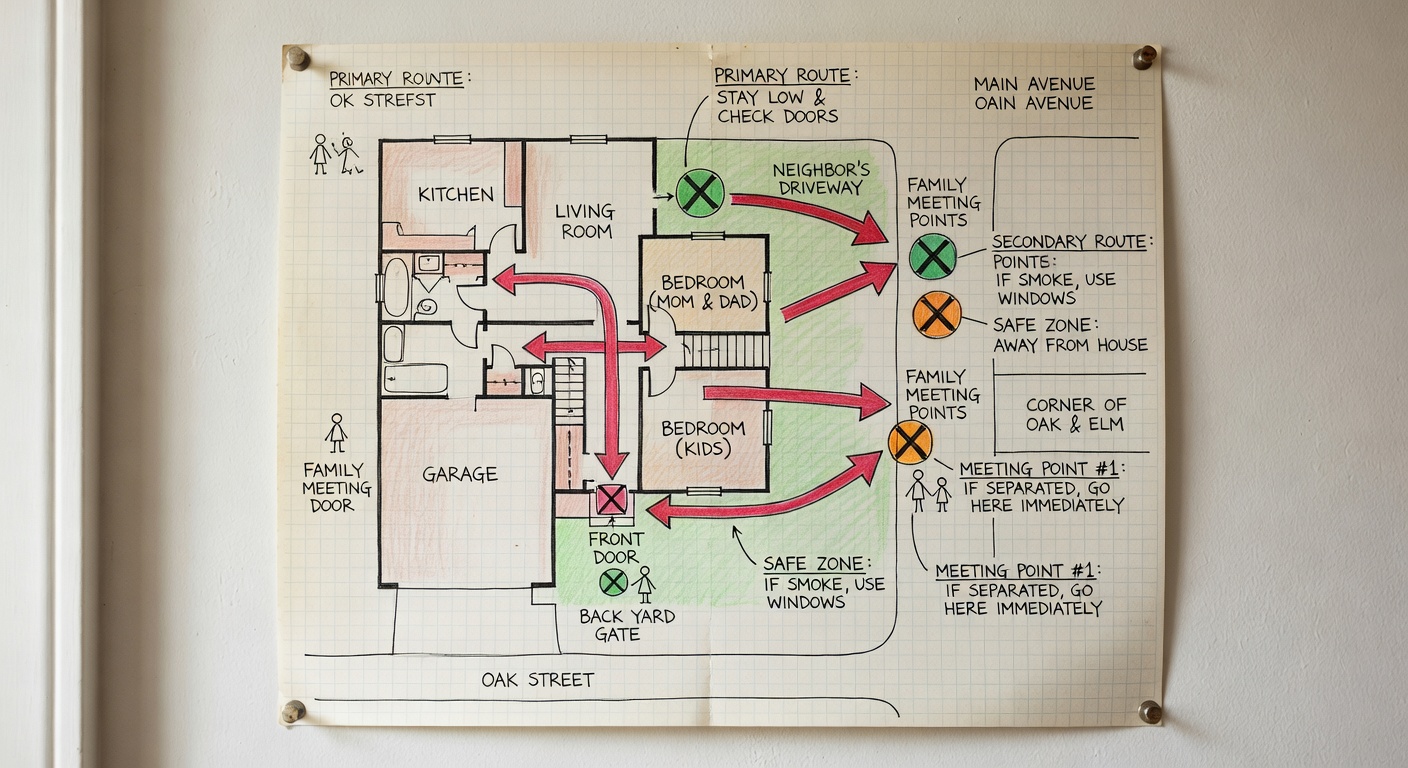
Step 2 — Establish Meeting Points
In a major disaster, family members may be at school, work, or other locations when it strikes. Pre-agreed meeting points allow everyone to reunite without relying on mobile phone communication.
Meeting Point 1 — Near Home
A visible landmark directly outside or very near your home: the building entrance, the corner store, a specific park bench. Use this if you need to exit your building quickly but have not yet started evacuation.
Meeting Point 2 — Evacuation Site
Agree on a specific spot within the evacuation site itself — e.g., "by the gymnasium entrance" or "under the blue tent area." Large sites can shelter hundreds of people; a specific meeting spot avoids confusion.
Step 3 — Family Communication Protocol
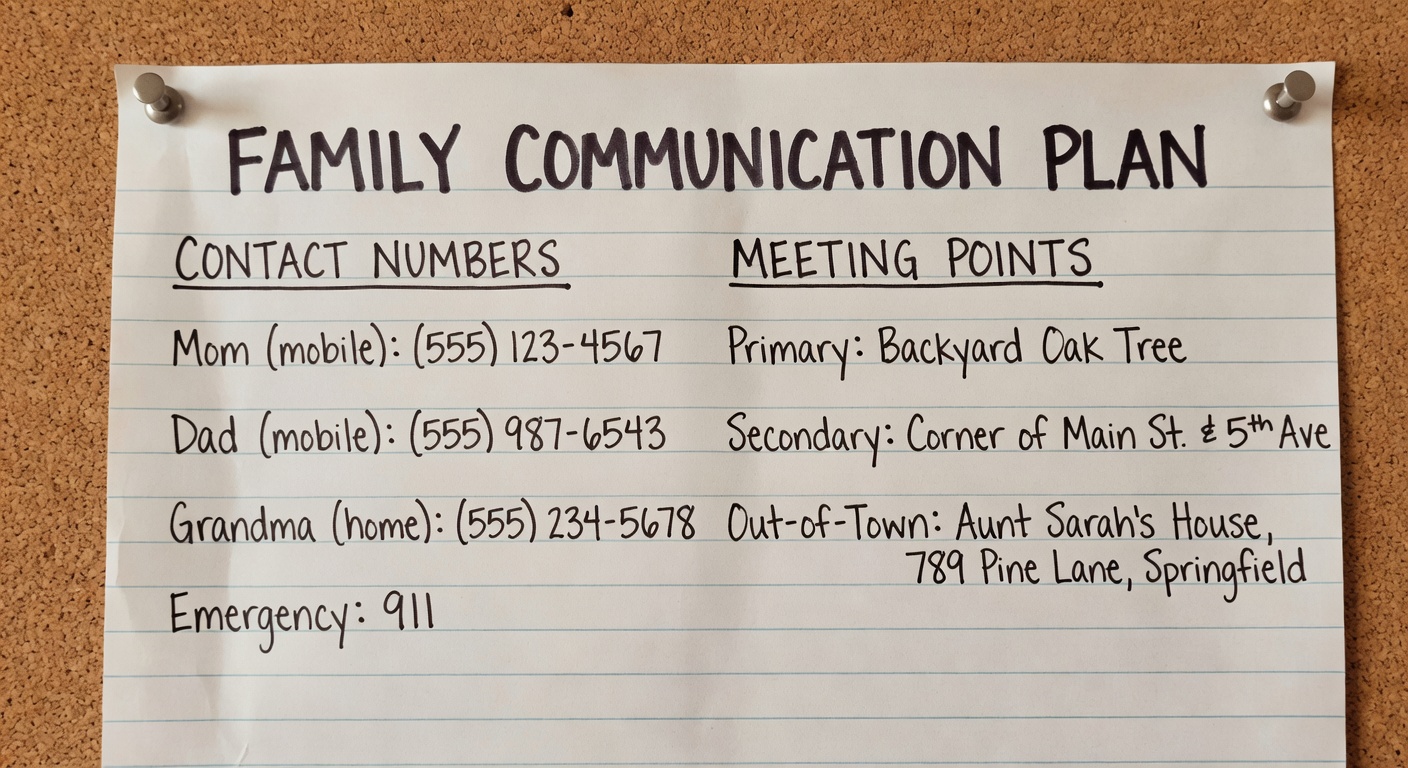
After the 2011 Tohoku earthquake, mobile networks were so congested that voice calls were nearly impossible for hours. Text messages used much less bandwidth and often got through. Line, SMS, and email all have roles in an emergency communication strategy. Plan for all scenarios.
- Designate an out-of-area contact. Identify a relative or close friend who lives in a different region of Japan or overseas. Every family member should call or message this person to check in — the out-of-area contact serves as a communication hub when local lines are jammed.
- Use the NTT Disaster Voice Messaging Service (災害用伝言ダイヤル 171). This service allows you to record and retrieve voice messages using any phone number. Practice using it every year on March 11 and September 1, when NTT opens the system for public trial.
- Use the NTT Disaster Web Messaging Board (web171.jp). A text-based version of the 171 service, accessible from any browser or app. Register your household phone number and leave a brief message about your status and location.
- Text, don't call. In the immediate aftermath of a disaster, send text messages (LINE, SMS, email) rather than making voice calls. Texts use less network bandwidth and have a higher chance of being delivered.
- Print the plan and post it visibly. Write your evacuation plan on a card and post it on the refrigerator. Give a copy to each family member to keep in their wallet or school bag. Do not rely solely on a smartphone — it may be lost, damaged, or uncharged.
Advertisement space — 728 × 90
Family Evacuation Plan Template
Use the template below as a guide. Print it, fill it in with your household's specific information, and post it where every family member can see it.
Household Emergency Plan — Fill In and Post
Special Considerations
Households with Elderly Members
If an elderly or mobility-impaired family member lives with you, identify in advance which neighbor or community member can assist them during evacuation. Register with your local ward office's jishu bousai soshiki (自主防災組織) — volunteer neighborhood disaster prevention groups that check on registered vulnerable residents during emergencies.
Evacuating with Pets
Japan's Environment Ministry guidelines recommend dōhan hinan (同行避難) — evacuating together with pets. However, not all shelters accept animals indoors. Prepare a separate pet kit (food, water, medication, carrier, vaccination records) and research your shelter's policy in advance. Some municipalities have designated pet-friendly areas adjacent to shelters.
Evacuation Drill: Practice Makes Permanent
- Conduct a household evacuation drill at least once a year
- Time the walk from your front door to the primary evacuation site
- Participate in your neighborhood's annual disaster drill (typically held September 1st)
- Test the NTT 171 service during the public trial periods (March 11, September 1)
- Review and update the plan after any change in household membership, address, or contact numbers
- Ensure children know the plan — practice asking them to recite the meeting point and out-of-area contact number